




photo Menu1_zps0679bf32.png  photo Home-5_zpsbb1afa0c.png  photo About-12_zps1f2d03d6.png  photo Recipes-2_zps90dfcd61.png  photo Sponsor-9_zps8283cfc7.png  photo Contact-16_zpsedfcb947.png  photo Menu2-2_zps6cf714ee.png
Showing posts with label Gourmet Food. Show all posts

July 16, 2014

Balsamic Rosemary Marinated Flank Steak

The summer is the perfect time to host a fun backyard barbecue and invite all of your friends over for a delicious warm weather meal on the patio. So when the forecast predicted an unseasonably cool Monday, we knew exactly what we wanted to do. 

 Knowing that Adam is quite the expert griller, I wanted to look for a recipe that would perfectly compliment his skills, be healthy, and just taste like the essence of summer. So you can imagine the perfect fit when I came across this mouth-watering flank steak recipe from Food & Wine magazine. 

 It took us a whopping 5 minutes to throw this easy marinade together the night before, and we let the steak marinade for 24 hours. As you can imagine hosting a group of 10 people for dinner, we were super relived to come home from a long day of work and simply throw the steak on the grill for a good sear for 10 minutes. 

It was perfectly cooked, juicy and lightly pink when we carved it up for our guests. There were so many good moans and groans while taking first bites that many of our guests begged for the recipe. Oh my goodness, this one is a keeper and definitely a must try for lean red meat lovers everywhere!  

//  Balsamic Rosemary Marinated Flank Steak  //
Adapted from Food & Wine


  1. Ingredients:
  2. 4 garlic cloves, minced
  3. 2 tablespoon rosemary leaves
  4. 1 tablespoon dried oregano
  5. 2 tablespoons whole-grain mustard
  6. 1/2 cup balsamic vinegar
  7. 1 cup extra-virgin olive oil, plus more for grilling
  8. Ground sea salt
  9. Freshly cracked pepper
  10. One 3-pound flank steak (or skirt steak works well too!)

Directions:


1) In a large bowl, combine the minced garlic, rosemary, oregano, mustard and vinegar and beat until well combine. Gradually add olive oil wine whisking until creamy. You can also use blender to combine all ingredients. Season mixture lightly with salt and pepper.

2) Place steak in a glass baking dish (9x13 works well), and sprinkle sea salt and pepper and rub into the top of the meat. Pour marinade over meat (you can reserve 1/4 cup of the mixture to drizzle over steak after cooked); turn the meat to coat well. Cover the dish with plastic wrap and refrigerate for at least 4 hours and up to 24 hours ( we recommend overnight for most flavorful results).

3) When ready to grill the steak, oil the grates of your grill well, and heat to moderate heat. Remove the steak from the marinade, letting the excess mixture drip off and season well with sea salt and pepper. Place the steak on the grill (turning occasionally) and sear on both sides lightly until internal meat temperature reaches 125 degrees (10 - 12 minutes).

4) Remove steak from the grill, and let rest on a carving board for 5 minutes. Once it is cooled slightly, carve 1/2 - 3/4 inch pieces of steak against the grain, and serve. Drizzle the reserved vinaigrette over each serving for maximum flavor.


I hope you will try this recipe the next time you're craving a juicy, lean piece of steak. 
You can't go wrong, my friends. This one is fail proof! 


Bon Appetit!

 photo Signature-5_zps1ea392df.png
Follow along here:  BlogLovin, Instagram, Twitter, Facebook, Pinterest
________________________________________________

June 18, 2012

Mingle Monday Weekly Blog Hop!

H eeeellllllooooooo Monday morning lovers!!!
Haha, jk. Who on earth actually loves Mondays? I'd like to meet such a person, because apparently I have a lot to learn from them! ;)

So tell me about your weekend - how was it? Did anyone get to celebrate with or honor their dads? I had a blast with my Mom and Dad in Kansas City this weekend!

Yesterday, I made Dad this spectacular Blackened Chicken w/ Cilantro Lime Quinoa recipe (which they RAVED about - try it ASAP!), as well as this Rustic Peach Pie (uh-mazing!) topped with vanilla bean ice cream.

I'm a little cooking machine, and subsequently my Dad's favorite child (eh, Linds and Kelly?!).

Anywho, if you are new to my humble little blog, I want to warmly welcome you from the bottom of my heart. Every single comment you leave me truly warms my heart! I hope you enjoy the week-long Mingle Monday blog hop and will be back again soon!

Please introduce yourself - I'd love to personally say hello! :)

_________________________________________________


{ Time to Mingle! }
 
.::::...::::...::::...::::..::::.


Pretty Pretty Please...

If you could find it in your big heart to pass the Mingle word along... I will love you forever and ever and ever... and ever. Twitter. Blog post. You name it, I love it.

In all seriousness, I truly appreciate each one of you who take an extra minute to go the extra mile each week! I cannot thank you for your sweet generosity enough! Let's add to this party!

{ Many thanks! }


LIFE OF MEG


_________________________________________________


How To Mingle:


1) Must be a [Life of Meg] follower to participate.

2) Scroll down to the bottom of this post and click on the link to enter your blog.

3) Go visit other blogs saying hello from Mingle Monday!

4) Answer the weekly question...

** Any summer reading recommendations? Puh-puh-please! **

_________________________________________________


_________________________________________________


Can't wait to visit your blog!! Please remember that the blog hop is open all week long, so spread the word!!

Don't miss out on the super fun Soak Up the Sun blog gift swap! Sign-up closes THIS WEDNESDAY at noon, so don't miss out!! And for all of your wonderful blog friends who have signed up, thank you! This is going to be a blast - can't wait to see who my swap partner is this time! :)

Also... I am now offering extremely affordable sponsorship opportunities - $10-22! If you are interested in advertising your blog, Etsy shop, or small business at a really great low price, please check out my sponsor page! Let's get your some exposure!


Wishing you a week full of glitter and puppy dogs!
(...or whatever floats your little boat!)


PS - Are you on Twitter? Follow me on the go!! :)

May 23, 2012

Big Chewy Monster Cookies

Many of you following along on Twitter and Instagram asked me to share my Big Chewy Monster Cookies recipe with you, and here it is!

To give you a little background, Adam and his friends took part of the day off to help him beautifully landscape his front yard. I knew the boys would be working hard all day in the sun, so I thought they deserved a nice little afternoon treat!

I was able to whip these deliciously chewy cookies up over my lunch break yesterday - so easy! When I was trying to dream up an idea, I wanted to find something ooey gooey, peanut buttery and hearty for these hard-working men!

My mind instantly shot to the Monster Cookies we made when we were kids.
These cookies are packed full of oats, crunchy peanut butter, melty chocolate chips, and M&M candies.

I swung by for only a few minutes, but upon leaving I got texts raving about how amazing they thought these cookies were. Yay! Music to my ears! These Chewy Monster Cookies would be perfect for a bake sale, birthday treats, or if you're craving some decadent cookie dough...

Recipe adapted from Paula Dean

Ingredients:


3 eggs
1 1/4 cups packed brown sugar
1 cup sugar
1/2 tsp. salt
1 tsp. vanilla extract
1 1/2 cups crunchy peanut butter (can sub creamy PB too!)
1 stick butter, softened
3/4 cup m&m candies
1/2 cup semi-sweet chocolate chips  
2 tsp. baking soda
4 1/2 cups quick oatmeal (not instant)


__________________________________________________________

Directions:


1) Preheat the oven to 350 degrees F.

2) In mixer, combine the eggs and sugars. Mix well.

3) Add the salt, vanilla, peanut butter, and butter until combined.
Stir in the chocolate candies, chocolate chips, baking soda, and oatmeal.

4) Use a 1/4 cup to make large balls of cookie dough, and place on the baking sheet. I suggest leaving the dough in big round quarter cup shaped unrounded balls, so that once baked they are very chewy and melt in your mouth. Leave 2 inches between each cookie dough ball.


Bakers Note - I tried not to eat more than one scoop full of dough, but it was pretty hard to do... don't say I didn't warn you! :)


5) Bake for 9 to 10 minutes. Do not over bake - cookies should barely start to look golden. Cookies may look slightly gooey, but they will set-up and continue to bake on the pan... promise! 

** Not over baking is the key to make them so deliciously chewy later! **

6) After 4-5 minutes, remove from cookie sheet and place on cooling rack.


.:::.:::.:::.:::.:::.


Bon Appetit!


 photo Signature-5_zps1ea392df.png
Follow along here:  BlogLovin, Instagram, Twitter, Facebook, Pinterest
________________________________________________

Mama's Key Lime Bars

With summer arriving, I've been craving the delicious fresh tastes that come with the season. Fresh fruit, vegetables from the farmer's market, light and refreshing summery drinks, and tangy desserts.

Needless to say, my taste buds were pretty happy last Sunday when my mom made Key Lime Bars to add to the dessert spread for my sister's graduation party.

Zesty, lime curd filling, melt-in-your-mouth crisp coconut crust, and that little drizzle of white chocolate cut the tartness of the bars perfectly! Are you drooling yet?

Everyone raved about my mom's cooking - but then again they always do - so I asked her if I could share the recipe!

Well, you all are in for a real treat! These bars would be perfect to bring to a potluck, show off at your 4th of July summer picnic, or just a nice little surprise after dinner. What I would give to be relaxing in a hammock, enjoying one of my mama's Key Lime Bars, and listening to Zac Brown Band! :)


{ Mama's Key Lime Bars }


Recipe by Bonnie Aeschliman


Ingredients:


Crust:

2 cup flour
1 cup chilled butter, cut into small pieces
1/2 cup powdered sugar
1 cup shredded sweetened coconut
1/4 tsp. salt


Filling:

1 1/2 cups sugar
4 eggs
3/4 cup key lime juice
2 tsp. grated lime zest
1 teaspoon baking soda
1/4 cup flour
Powdered sugar for dusting
1 oz. melted white chocolate

_____________________________________________________

Directions:


1) Preheat oven to 350 degrees. Grease 9 x 13 baking dish.

2) Combine flour, butter, powdered sugar, coconut, and salt in a food processor until it forms moist clumps.
Press into prepared pan and bake 20 minutes or until edges are golden.

3) Whisk sugar, eggs, lime juice, lime zest, baking powder and flour in large bowl until blended. Pour over hot crust. Bake until topping is set and lightly golden, about 25 minutes. Dust with powdered sugar.

4) Cool in pan on a rack slightly. Drizzle with white chocolate. Cool Completely and then cut into squares. They stay best when wrapped tightly and chilled.

_____________________________________________________


Bon Appetit!


_______________________________________________________

PS - Want to gain new followers?!

Click HERE to visit my weekly Mingle Monday blog hop! Open all week long! :)

_____________________________________________________________


May 2, 2012

Skinny Greek Yogurt Chicken

For weeks now I have seen this recipe for "Melt in your mouth chicken", so when date night rolled around a few weeks ago I knew exactly what we needed to try!

I decided to sub the mayo for greek yogurt for a low-cal, healthier spin. This recipe was so extremely easy, convenient, and absolutely delicious. The greek yogurt locks in the moisture, and the spices just kick it up to a whole different level.

We were both huge fans... in fact I've made it two more times since then because it was so yummy! Paired with crunchy baked okra and roasted garlic brussel sprouts... oh yum! Super low in calories and high in protein, both your waistline and your hunky meat-and-potatoes kind of man will thank you!


{ Skinny Greek Yogurt Chicken }


Ingredients:

4 boneless/skinless chicken breasts
1 cup plain greek yogurt (Chobani 0%)
1/2 cup parmesan cheese - grated
1 teaspoon garlic powder
1 1/2 teaspoon seasoned salt
1/2 teaspoon pepper


Directions:


1) Preheat oven to 375 degrees.

2) Combine greek yogurt, parmesan cheese, garlic powder, seasoned salt, and pepper in a bowl.

3) Line baking sheet with foil and spray lightly with cooking spray.

4) Coat each chicken breast in greek yogurt mixture and place on foiled baking sheet.

5) Bake for 45 minutes.

6) If you would like to brown the top, turn the broiler on high for 3 minutes or so. Remove from oven once top is golden brown.


.:::.:::.:::.:::.


Yes, I told you, the world's easiest meal, and clean-up is even easier!

For all of us working women, this would be extremely easy to prep the night before. Then all you have to do at the end of a long day is preheat the oven and throw the chicken in! Voila - a healthy meal in less than an hour!

I promise you will love it. In fact, this leftover hater looked forward to lunch the next day - shocking!


Bon Appetit!


 photo Signature-5_zps1ea392df.png
Follow along here:  BlogLovin, Instagram, Twitter, Facebook, Pinterest, Etsy
________________________________________________

February 7, 2012

Guinness Chocolate Ganache-Filled Cupcakes

This recipe is for all of my Twitter friends out there who were oooh'ing and aaahh'ing over this weekend's Super Bowl baking photos! Well, like I promised, here is the recipe that you all need to try ASAP. I could tell by my empty cupcake tray after the Super Bowl that everyone just hated them! ;)

Well it all started when Adam's sister, Meredith, gave me the perfect Christmas present... large bakery-style frosting tips! She knows me too well! So needless to say I've been dying to use them since I unwrapped these little gems! Thanks, Mere! xo

I was pretty nervous when I started this recipe for several reasons...


_____________________________________


1) New recipes.
Both the cupcake and buttercream recipes I had never tried before.

2) I've never made ganache.
Doesn't it just sound fancy? Ganache. Woah.
I did not go to culinary school, so something that sounds this fancy just seems hard.

3) I'm not a cupcake baker.
I typically stick to cookies (my specialty), so I think the idea of filled cupcakes was twice as terrifying

_____________________________________


...but I've learned that cupcakes recipes are easy, ganache sounds fancy but is totally doable, and apparently I am a cupcake baker! Now I want to experiment even more with these things!!


{ Guiness Double Chocolate Ganache-Filled Cupcakes }

Adapted from Brown Eyed Baker's Irish Car Bomb Cupcakes


{ Footballs = piped melted chocolate! }


Ingredients:

- 1 cup Guinness stout
- 1 cup unsalted butter, at room temperature
- 3/4 cup Dutch-process cocoa powder
- 2 cups all-purpose flour
- 2 cups granulated sugar
- 1 1/2 teaspoons baking soda
- 3/4 teaspoons salt
- 2 eggs
- 2/3 cup sour cream


Ganache Filling:

- 8 ounces bittersweet chocolate
- 2/3 cup heavy cream
- 2 tablespoons butter, at room temperature


Buttercream:
- Magnolia Bakery Vanilla Buttercream Recipe


______________________________________


Cupcakes:

1. Preheat oven to 350 degrees F. and line 24 cupcake cups with liners.

2. Bring the Guinness and butter to a simmer in a heavy, medium saucepan over medium heat. Add the cocoa powder and whisk until the mixture is smooth. Cool slightly.

2. Whisk the flour, sugar, baking soda and salt in a large bowl to combine. Using an electric mixer, beat the eggs and sour cream on medium speed until combined.

3. Add the Guinness-chocolate mixture to the egg mixture and beat just to combine.

4. Reduce the speed to low, add the flour mixture and beat briefly. Using a rubber spatula, fold the batter until completely combined.

5. Pour 2/3 full into cupcake liners and bake about 17 minutes. Toothpick inserted into the center should come out clean. Cool the cupcakes on a rack.


Ganache:

1. Finely chop the chocolate and transfer it to a heatproof bowl.

2. Heat the cream until simmering on stove and pour it over the chocolate.

3. Let it sit for one minute and then, using a rubber spatula, stir it from the center outward until smooth.

4. Add the butter and stir until combined. Let the ganache cool until thick but still soft enough to be piped.


How to Fill:

1) Using the bottom of a large decorating tip, cut the centers out of the cooled cupcakes, going about two-thirds of the way down.

2) Transfer the ganache to a piping back with a wide tip and fill the holes in each cupcake to the top.


{ Filling photo via Brown Eyed Baker }


Frost Cupcakes:

Whip up a batch of the Magnolia Bakery Vanilla Buttercream (in the Meg Cooks section) that I used, or top with any favorite frosting recipe! Instant hit!


_____________________________________________


...and voila! Such a tasty, decadent recipe! The cake part is super moist and delicious, the ganache is smooth, and the buttercream adds the perfect flavor combo to this delight!

this recipe would be great for Valentine's Day, and super rich if topped with a chocolate buttercream! Think about it...


Bon Appetit!


Magnolia Bakery Vanilla Buttercream

Always on the hunt for the best buttercream, I think I might have found a top contender with Magnolia Bakery's vanilla buttercream. The texture is light and fluffy, smooth on your tongue, with a delicious vanilla velvety taste... what a dream! Definitely a must try for cakes, cupcakes, sandwich cookies and anything your little heart desires.


Now, I'm a frosting lover, so it would be hard to find a frosting I don't like. Adam, on the other hand, is not... but he LOVED this recipe - I was completely shocked! So there you have it, folks. If I can convince the frosting despiser... you can convince anyone it's the world's best buttercream!


{ Magnolia Bakery's Vanilla Buttercream }

via: Martha Stewart


Ingredients:

- 1 cup (2 sticks) unsalted butter, softened

- 6 to 8 cups confectioners' sugar

- 1/2 cup milk

- 2 teaspoons vanilla extract


Directions:

1. In the bowl of an electric mixer fitted with the paddle attachment, combine butter, 4 cups sugar, milk, and vanilla.

2. Beat on medium speed until smooth and creamy, 3 to 5 minutes.

3. Gradually add remaining sugar, 1 cup at a time, beating for about 2 minutes after each addition, until icing reaches desired consistency.

** You may not need to add all the sugar. I use approx. 6 - 6.5 cups. **

4. Store in an airtight container for up to 3 days.


Bon Appetit!


September 21, 2011

DoubleTree Chocolate Chip Cookies

Start your ovens, ladies!
Boy have I got a recipe for you! So, I'm not sure how many of you have actually been a guest at the DoubleTree hotel, but perhaps you've heard of their legendary cookies?

Well, we have a partnership with the DoubleTree here in Kansas City, and when we had a meeting with them in the office, they brought us a ton of yummy chocolate chip cookies!

Naturally, I had to try one... duh. As soon as that delectible cookie hit my taste buds, I knew I had to find the recipe STAT. After doing some research, this is the recipe that I've found on several sites. Apparently it use to be on the Top Secret Recipes web site, which is now charging a small fee for it.

So, here ya go! I can't wait to test it out too, and be another one of the thousand people who say it's spot on the money!


{ DoubleTree Chocolate Chip Cookies }


{img}


Ingredients

1/2 cup rolled oats
2-1/4 cups all-purpose flour
1-1/2 tsp. baking soda
1 tsp. salt
1/4 tsp. cinnamon
1 cup butter, softened
3/4 cup brown sugar, packed
3/4 cup granulated sugar
1-1/2 tsp. vanilla
1/2 tsp. lemon juice
2 eggs
3 cups semi-sweet, chocolate chips
1-1/2 cups chopped walnuts


Instructions

1) Grind oats in a food processor or blender until fine.

2) Combine the ground oats with the flour, baking soda, salt and cinnamon in a medium bowl.

3) Cream together the butter, sugars, vanilla, and lemon juice in another medium bowl with an electric mixer. Add the eggs and mix until smooth.

4) Stir the dry mixture into the wet mixture and blend well. Add the chocolate chips and nuts to the dough and mix by hand until ingredients are well blended.

** For the best results, chill the dough overnight in the refrigerator before baking the cookies. **

5) Preheat oven to 350 degrees. Spoon rounded 1/4 cup portions onto an ungreased cookie sheet. Place the scoops about 2 inches apart. Bake for 16 minutes or until cookies are light brown and soft in the middle.

** They may look underdone, but this is normal and the secret to perfectly soft bakery-style cookies. They will continue baking on the sheet after you take them out of the oven. **

6) Remove from the baking sheet after they cool for 4-5 minutes. Serve and enjoy!


{img}


.:::.:::.:::.:::.:::.


Is anyone else in love with DoubleTree cookies too?! Can't wait to get baking!


Bon Appetit!


________________________________________

PS - In case you missed the Mingle Monday blog hop yesterday, go check it out! Get your blog some exposure and find some other great blogs!

________________________________________

September 11, 2011

Toasted Coconut Chocolate Chip Cookies

Happy Sunday, Y'all!
I hope you're having a relaxing weekend so far, I know I am! We've cooked out delicious burgers and brats, have football going on the big screen, and I have one sleepy/handsome man beside me on the couch. Great fall day if you ask me!

I love spending time over at BF's house. He has 3 wonderful friends who live with him that we both adore - they bring a lot of joy into my life! As per the usual, I've already received baked goods requests within the first hour of being here {silly boys!}, and one of the top requested is my new Toasted Chocolate Chip Cookies recipe.

I came up with this recipe a few weeks ago using a few of my go to cookie dough recipes as the base. Adam is the biggest coconut lover, so I thought it would be fun to throw in a nice twist on a great American classic... the chocolate chip cookie.

I loved the way this recipe turned out on the first try - definitely a keeper! The cookies have soft, chewy centers with perfectly browned edges. The toasted coconut added a nice texture and a subtle nutty flavor. And of course, melty chocolate chips were the perfect way to top off a delicious cookie.

This recipe has not only been approved, but thumbs'd up by 4 hungry boys, countless co-workers, and my cookie-loving brother. Try it out, you won't be disappointed!


{ Toasted Coconut Chocolate Chip Cookies }


Ingredients:

1 cup butter (room temperature)
1 cup sugar
1/2 cup brown sugar
2 eggs
1 teaspoon vanilla
2 1/4 cups flour
1 teaspoon baking soda
1 teaspoon salt
2 cups semisweet chocolate chips (or I love using chocolate chunks!)
2 cups toasted sweetened coconut


_____________________________________

Directions:


1) Preheat the oven to 375 degrees.

2) Measure 2 cups of sweetened, flaked coconut and spread it evenly on a baking sheet. Bake in the oven for 5 minutes. Remove baking sheet and stir coconut halfway through to ensure consistently toasted coconut.

When you remove from the oven after the 5 minutes is up, coconut should be a nice golden honey brown color.

3) In a large bowl, cream together the butter, brown sugar and white sugar until fluffy and blended.

4) Beat in the eggs one at a time, then stir in the vanilla.

5) Combine the flour, baking soda and salt; stir into the creamed mixture.

6) Mix in chocolate chips and toasted coconut by hand. Drop by rounded spoonfuls onto cookie sheets.

7) Bake for 8 minutes - cookies may look undercooked, but they are done. Let cookies cool on baking sheet for 4-5 minutes before removing to a wire rack to cool.


Bon Appetit!


PS - Don't miss out on the fun! Sign up HERE for the Fall Frenzy blog gift swap!

September 5, 2011

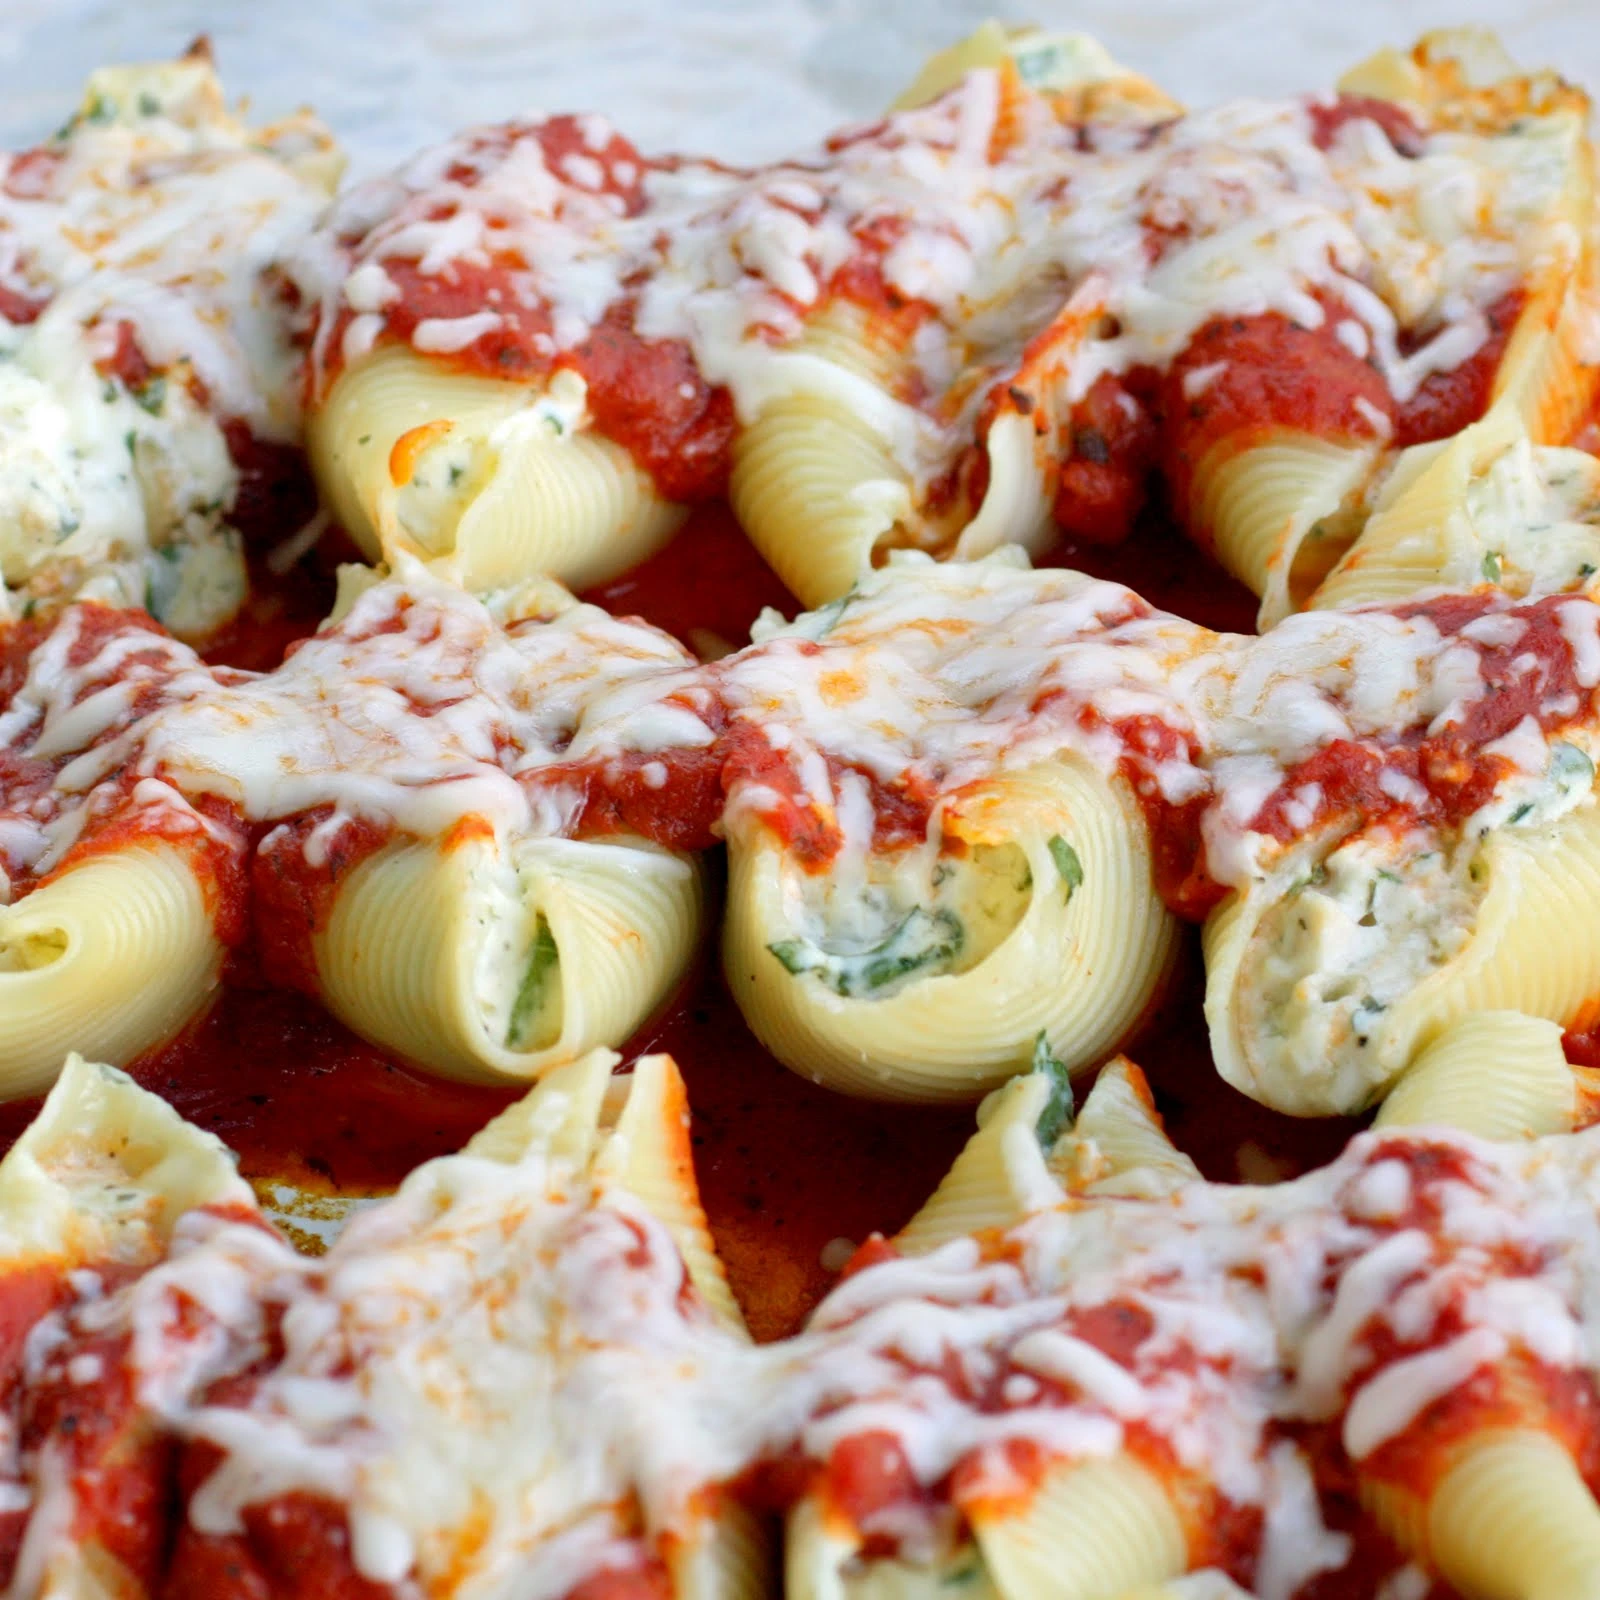
Cheese & Spinach Stuffed Shells

In the need for something new and tasty for dinner?
I don't know about you, but I am tired of using the same recipes over and over again. Although I love them, and they are my go-to's, I was in the need to shake things up a bit.

Naturally, being on Pinterest helps me find new recipes and get inspired. While browsing a few weeks ago, I saw a photo for cheese and spinach stuffed shells with meat sauce... umm, yum! So, I started looking through recipes, and pieced together a recipe of my own.

Being the single gal I am, I didn't want to make this meal just for me and eat leftovers for 8 consecutive meals. So naturally I turned to my favorite easy-to-please audience... BF and his roomies!

This recipe was super yummy, easy and crowd pleasing. I think the boys' happy plates were a direct reflection of their happy tummies. :) Total hit.


 Cheese & Spinach Stuffed Shells 

Image result for cheese and spinach stuffed shells

Ingredients:

1 (12 ounce) package jumbo pasta shells
(I use whole wheat when available)
1 (32 ounce) container low-fat ricotta cheese
8 ounces low-fat cottage cheese
1 - 1.5 package(s) of shredded low-fat mozzarella
8 ounces grated Parmesan cheese
2 cups fresh spinach
1 tablespoon Italian seasoning
2 teaspoons salt
1 teaspoon ground black pepper


Sauce:

2 (28 ounce) jars pasta sauce (I use Chunky Ragu)
1 lb. ground lean chicken
1 onion, diced
3 cloves garlic
1 tomato, diced
salt and pepper to taste

1 gallon size Ziploc bag

_____________________________________

Directions:

1) Preheat oven to 350 degrees.

2) Saute olive oil, garlic, and diced onions for 3-5 minutes over medium heat. Add ground turkey and brown with the onions until all pink coloring is gone from the meat.

3) Reduce heat to low. Add diced tomatoes, and 2 jars of pasta sauce (because I like my pasta saucey!!). Let simmer and stir occasionally.

4) Cook shells according to the box instructions, and place in a bowl of cold water after boiling to stop the cooking. This is a very important step! If you skip the cold water bath after boiling, the shells will tear when you fill them.

5) Combine ricotta, Parmesan, cottage cheese, and seasoning until thoroughly integrated and smooth. Microwave the spinach for a minute until wilted, and add to the mixture.

6) Spread some meat sauce on the bottom of your two 9x13 pans.

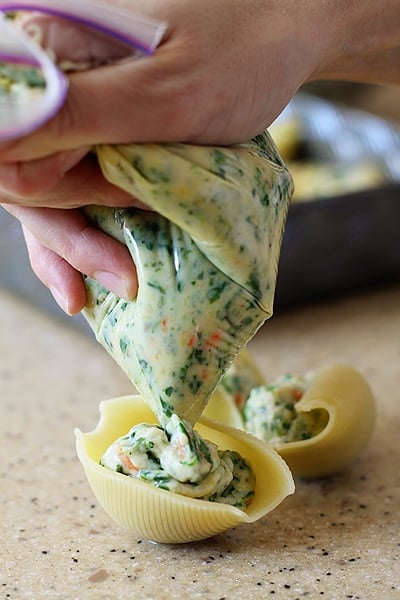
7) Spoon cheese/spinach mixture into the Ziploc bag and work all of it into one lower corner. Twist the top of the Ziploc to look like a piping bag, and cut a dime-sized opening in the bottom corner with scissors.


8) Begin removing shells one at a time from the water, and begin piping the cheese/spinach mixture into each shell. Avoid over-filling the shells so that you have enough filling to go around.

9) After filling the shells, place them next to each other in dish. After 10-12 shells fill the pan, cover in meat sauce and sprinkle the mozzarella over the top. Repeat with remaining shells in the second 9x13 dish.

10) Bake for 45-60 minutes, or until cheese is bubbly around the edges and shells are set.


{ Serve with a fresh salad and garlic bread - yum! }


Bon Appetit!


________________________________________

PS - In case you missed the Mingle Monday blog hop post , go check it out! Get your blog some exposure and find some other great blogs! Happy Labor Day!

________________________________________

April 13, 2011

Juicy Tidbits

We need to catch up!!
I've been slacking on keeping all of you in the loop, so I thought I'd share a few random recaps and new info for your fabulous reading pleasure!

My goodness, there are so many things to be thankful for that make me smile lately, so let's catch up, shall we?


______________________________________


1) George Strait Concert Recap

Have I seriously not update you on the best weekend ever? Well here we go! BF and I went to Columbia to finally experience his much anticipated Valentine's/B-day present... George Strait in concert!

Lee Ann Womack and Reba were totally fab, but nothing beat the look on BF's face when George Strait {his country idol} sang his favorite song ("Amarillo by Morning" - so good!). I almost enjoyed watching BF watch the concert more than actually watching it myself, just because he had the cutest smile on his face as we sang all the words to every song.

Side note: I did attempt to capture this experience in photos. However, I couldn't really do that when my camera died before we could even successfully snap one picture! Boo.


2) Madison Trip

Time for vacation! This little blondie is heading north today for a little R&R. BF's sweet sister and her BF live up in Madison, so we are pumped to go visit them! They recently rescued a cute little puppy and I am excited to see this little fur ball!


{ Meredith, Kyle & Oliver - stolen photo from Mer's FB! }


It's also nice that they have planned everything for us. We are going to visit several breweries and chocolatiers as we tour the town - YUM! They plan to take us to all of their favorite places and restaurants to give us the full Madison experience.

I am also looking forward to our buddy time during the 8 hour car ride. I'm pretty sure BF is the funnest (yes, it's a word in my book) roadtrip partner in all the world... let the adventure begin!


{ BF and I in Tucson this winter }


PS- Any tips or advice from any other Madison goers?


3) New Recipes

A huge thank you to my dear friend Trish for sending me an awesome healthy recipe Web site... Skinny Taste! There are so many amazing, healthy but yummy recipes that I'm dying to try!!


{ Whole Wheat Blueberry Muffins? Yes, please!! }


{ Pineapple Bliss Cupcakes - Yum! }


I've been on the hunt for new recipes, so when she sent this it was like Christmas morning to me. Go visit Skinny Taste and check it out!


4) Wonderful Blog Friends

I can't thank ya'll enough for all of your kind, supportive and encouraging words on my Weekly Weigh-In series!

And I LOVED all the tips you gals gave me on traveling healthy!! I'm SO impressed! xoxo

______________________________________


So anyway, I'm so glad we got caught up (at least on my end) - what's new with you? I sincerely hope each and every one of you are having an unexpectedly good week, and if not, make that weekend count, girl!

Sending you lots of love, happy early weekend wishes, and hugs! From the bottom of my heart, thank you so much for being such a blessing and making me smile. I love every single comment, e-mail, etc.! You're the BEST!


October 16, 2010

Ooey Gooey Cinnamon Rolls

My zebra mug is filled to the brim with my favorite amaretto coffee and the sweet smell of cinnamon lingering in the air. Yes, I am still in my jammies. This is my absolute favorite way to do Saturday morning. Lazy, cozy and happy.

My home is full of my very favorite girlfriends, who are in town visiting for the weekend. I wanted to make something special while they were here, so I made the most amazing ooey gooey cinnamon roll recipe.


After trying out several recipes, I've combined my favorite parts and added my own fabulous flair!

Don't be intimidated by this recipe... I've made it easy breazy!

____________________________________________


Ingredients


Dough:

1/4-ounce package yeast
1/2 cup warm water
1/2 cup scalded milk
1/4 cup sugar
1/3 cup butter or shortening
1 teaspoon salt
1 egg
4 cups all-purpose flour


Filling:

1/3 cup softened butter
3/4 cup brown sugar
1/4 cup white sugar
3 1/2 tablespoons ground cinnamon


Frosting:

1/4 cup softened butter
3 oz. softened cream cheese
1 1/2 cups powdered sugar
1 teaspoon vanilla extract
1/8 teaspoon salt


Heat oven to 350 degrees F.
____________________________________________________


Dough Directions:


1) In a small bowl, dissolve yeast in warm water and set aside.

2) In a large bowl mix milk, sugar, melted butter, salt and egg.

3)Add 2 cups of flour and mix until smooth. Add yeast mixture.

4)Mix in remaining flour until dough is easy to handle. Knead dough on lightly floured surface for 3-5 minutes.


5) Place in well-greased bowl, cover and let rise until doubled in size, usually 1 to 1 1/2 hours.

6) Wait until dough has doubled in size and roll out on a floured surface into a 15 by 9-inch rectangle.

____________________________________________________


Filling Directions


1) Spread melted butter all over dough.

2) Mix sugar and cinnamon and sprinkle over buttered dough.

3) Beginning on the longest side, roll up dough and pinch edge together to seal. Cut into 12 to 15 slices.

4) Place cinnamon roll slices close together in the pan and let rise until dough is doubled, about 45 minutes. Bake for about 30 minutes.

____________________________________________________


Yummy Frosting


1) Beat butter and cream cheese together until blended thoroughly.

2) Add powdered sugar, salt and vanilla.

3) Whip until fluffy.

4) Spread on warm rolls.

_____________________________________________________


These cinnamon rolls are such a hit! Perfect for holidays, family occasions, and out of town relatives. I've got nothing but amazig compliments with this all-star recipe, so you have to try it out!

This last time, I tripled the recipe, made them as directed and let them rise. I them placed seran wrap directly touching the doughy rolls, covered the whole pan and added the lid and froze them.

All you have to do is move the pan of frozen rolls to the fridge the day before. Take them out 30 minutes before you want to bake them and they come out freshly made! Sounds lke a perfectly domestic way to impress your guests!


Bon Appetit!


June 30, 2010

Fabulous 4th Recipes and Decor

No festive 4th of July shin-dig can be complete without amazing decorations and delicious food! Check out some of my favorite festive finds...


Red Velvet Cake a la Bon Appetit Magazine


Pottery Barn


Country Living


Martha Stewart


Southern Living


Pottery Barn


Patriotic Flag Cake a la Martha Stewart

__________________________________________________


I know, I know.. now you're drooling, right?

{ Me too! }


__________________________________________________


I can't wait to road trip to the big OKC to see my besties! Lots of BBQs, baking, and fun to be had... look out!


What are your fabulous 4th plans?
Have any cute patriotic decor or recipes?


01 09 10